蝙蝠岛资源网 Design By www.hbtsch.com
原图

最终效果

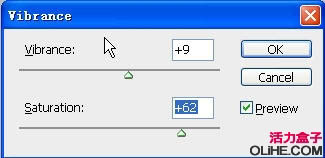
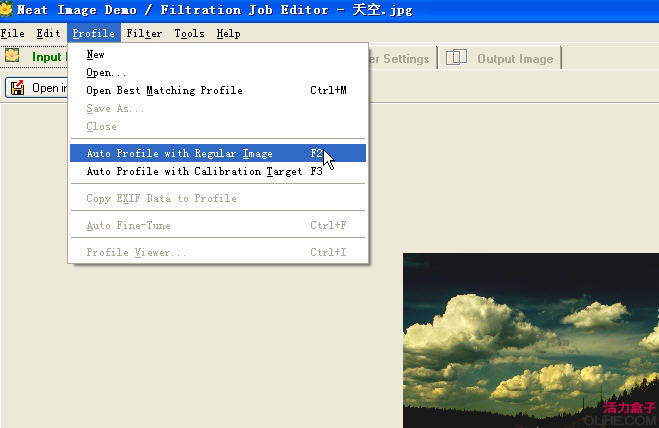
1、我们将分开处理道路和云层。 2、在photoshop原图素材,双击背景层命名为“道路”。Ctrl+J复制图层,命名为“天空”。

3、我们第一次处理天空,图像-调整-变化,加强黄色。
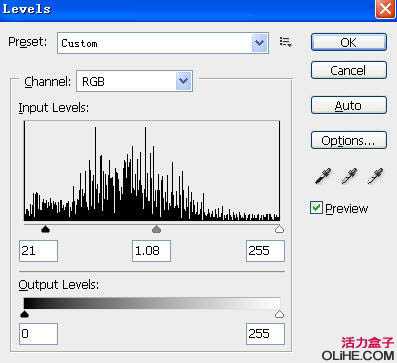
4、图像-调整-色阶,参数设置为21,1.08,255。
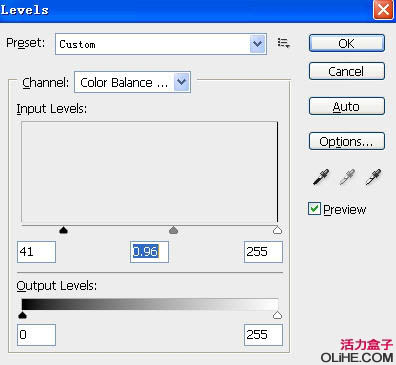
5、复制图层命名为“天空01” ,执行:图像-调整-色阶,参数设置为41,0.96,255。
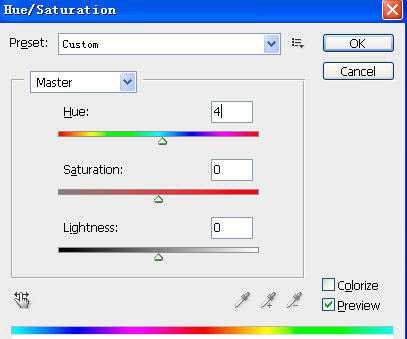
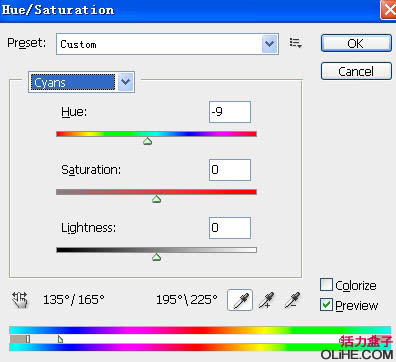
6、“天空01”,图像-调整-色相/饱和度,色相+4,“洋红”色相-9。
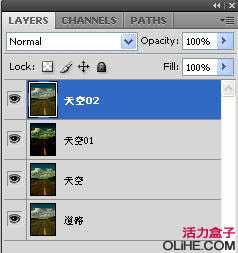
7、复制“道路”图层,命名为“天空02”,置于最顶层。
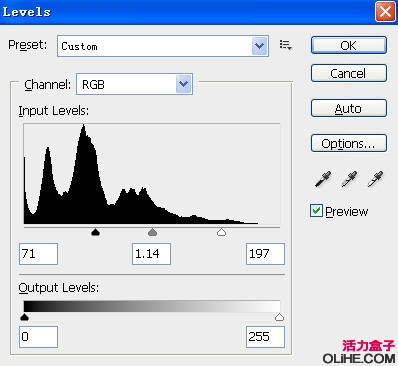
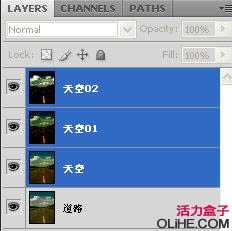
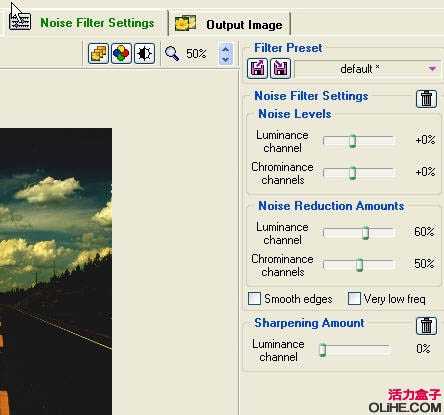
8、图像-调整-色阶,参数设置为74,1.14,197。图层不透明度设为74%,画面中部分云层存在过曝的问题,所以我们选择橡皮擦工具,选用柔角画笔,不透明度70%,然后擦除云层呈现白色的过曝部分。
9、拼合“天空”、“天空01”、“天空02”图层,文件-另存为,导出图片为“天空.jpg”。我想要画面更平滑一些,用Neat image2滤镜适当降噪处理,参数设置如下图,没有这款滤镜的可以去网上下载。
10、降噪后存为”天空-柔和.jpg”。
上一页12 下一页 阅读全文
最终效果
1、我们将分开处理道路和云层。 2、在photoshop原图素材,双击背景层命名为“道路”。Ctrl+J复制图层,命名为“天空”。
3、我们第一次处理天空,图像-调整-变化,加强黄色。
4、图像-调整-色阶,参数设置为21,1.08,255。
5、复制图层命名为“天空01” ,执行:图像-调整-色阶,参数设置为41,0.96,255。
6、“天空01”,图像-调整-色相/饱和度,色相+4,“洋红”色相-9。
7、复制“道路”图层,命名为“天空02”,置于最顶层。
8、图像-调整-色阶,参数设置为74,1.14,197。图层不透明度设为74%,画面中部分云层存在过曝的问题,所以我们选择橡皮擦工具,选用柔角画笔,不透明度70%,然后擦除云层呈现白色的过曝部分。
9、拼合“天空”、“天空01”、“天空02”图层,文件-另存为,导出图片为“天空.jpg”。我想要画面更平滑一些,用Neat image2滤镜适当降噪处理,参数设置如下图,没有这款滤镜的可以去网上下载。
10、降噪后存为”天空-柔和.jpg”。
上一页12 下一页 阅读全文
标签:
高清,黄昏色
蝙蝠岛资源网 Design By www.hbtsch.com
广告合作:本站广告合作请联系QQ:858582 申请时备注:广告合作(否则不回)
免责声明:本站文章均来自网站采集或用户投稿,网站不提供任何软件下载或自行开发的软件! 如有用户或公司发现本站内容信息存在侵权行为,请邮件告知! 858582#qq.com
免责声明:本站文章均来自网站采集或用户投稿,网站不提供任何软件下载或自行开发的软件! 如有用户或公司发现本站内容信息存在侵权行为,请邮件告知! 858582#qq.com
蝙蝠岛资源网 Design By www.hbtsch.com
暂无Photoshop调出高清的黄昏色公路图片的评论...
《魔兽世界》大逃杀!60人新游玩模式《强袭风暴》3月21日上线
暴雪近日发布了《魔兽世界》10.2.6 更新内容,新游玩模式《强袭风暴》即将于3月21 日在亚服上线,届时玩家将前往阿拉希高地展开一场 60 人大逃杀对战。
艾泽拉斯的冒险者已经征服了艾泽拉斯的大地及遥远的彼岸。他们在对抗世界上最致命的敌人时展现出过人的手腕,并且成功阻止终结宇宙等级的威胁。当他们在为即将于《魔兽世界》资料片《地心之战》中来袭的萨拉塔斯势力做战斗准备时,他们还需要在熟悉的阿拉希高地面对一个全新的敌人──那就是彼此。在《巨龙崛起》10.2.6 更新的《强袭风暴》中,玩家将会进入一个全新的海盗主题大逃杀式限时活动,其中包含极高的风险和史诗级的奖励。
《强袭风暴》不是普通的战场,作为一个独立于主游戏之外的活动,玩家可以用大逃杀的风格来体验《魔兽世界》,不分职业、不分装备(除了你在赛局中捡到的),光是技巧和战略的强弱之分就能决定出谁才是能坚持到最后的赢家。本次活动将会开放单人和双人模式,玩家在加入海盗主题的预赛大厅区域前,可以从强袭风暴角色画面新增好友。游玩游戏将可以累计名望轨迹,《巨龙崛起》和《魔兽世界:巫妖王之怒 经典版》的玩家都可以获得奖励。
更新日志
2026年06月28日
2026年06月28日
- 小骆驼-《草原狼2(蓝光CD)》[原抓WAV+CUE]
- 群星《欢迎来到我身边 电影原声专辑》[320K/MP3][105.02MB]
- 群星《欢迎来到我身边 电影原声专辑》[FLAC/分轨][480.9MB]
- 雷婷《梦里蓝天HQⅡ》 2023头版限量编号低速原抓[WAV+CUE][463M]
- 群星《2024好听新歌42》AI调整音效【WAV分轨】
- 王思雨-《思念陪着鸿雁飞》WAV
- 王思雨《喜马拉雅HQ》头版限量编号[WAV+CUE]
- 李健《无时无刻》[WAV+CUE][590M]
- 陈奕迅《酝酿》[WAV分轨][502M]
- 卓依婷《化蝶》2CD[WAV+CUE][1.1G]
- 群星《吉他王(黑胶CD)》[WAV+CUE]
- 齐秦《穿乐(穿越)》[WAV+CUE]
- 发烧珍品《数位CD音响测试-动向效果(九)》【WAV+CUE】
- 邝美云《邝美云精装歌集》[DSF][1.6G]
- 吕方《爱一回伤一回》[WAV+CUE][454M]