蝙蝠岛资源网 Design By www.hbtsch.com
最终效果

1、首先我们把整体拆分为马头及文字,如下图。马头部分的教程请点这里查看。

<图1>

<图2>
2、保存下图所示的图片素材,新建一个1024 * 700像素的文件,背景填充黑色。打开保存的素材(PNG透明格式),用鼠标拖到新建的文件里面。

<图3>
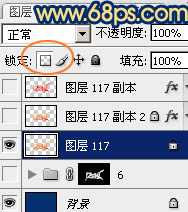
3、把拖进来的文字解锁,是的移动位置,与马头拼接好。然后锁定图层像素区域,如下图。
<图4>
4、选择渐变工具,颜色设置如图5,在属性栏选择径向渐变,然后由下至上拉出土6所示的渐变色。

<图5>

<图6>
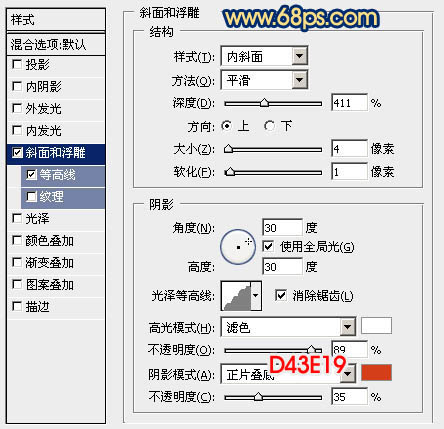
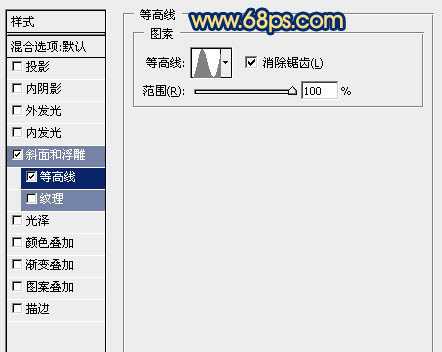
5、双击图层面板文字缩略图后的蓝色区域调出图层样式,设置斜面与浮雕及等高线,参数设置如图7,8,效果如图9。
<图7>
<图8>

<图9>
6、按Ctrl + J 把文字图层复制一层,如下图。

<图10>
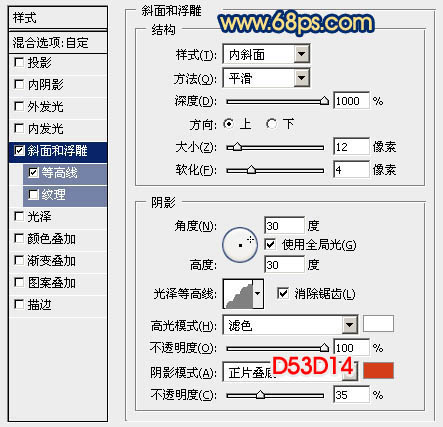
7、双击文字副本后面的蓝色区域调出图层样式,修改一下斜面和浮雕及等高线的数值,如图11,12。确定好把图层填充改为:0%,不透明度改为:70%,效果如图13。
<图11>
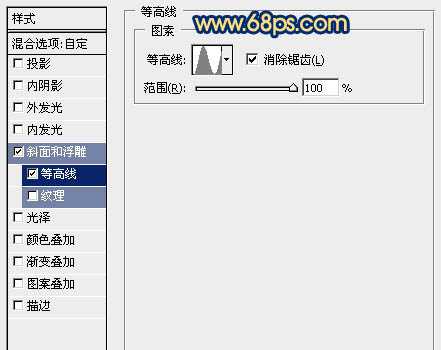
<图12>

<图13>
8、安装Ctrl键点击图层面板文字缩略图载入文字选区,选择矩形选框工具,把选区往右下方移动移动距离,如下图。

<图14>
9、在背景图层上面新建一个组,给组添加图层蒙版,如下图。

<图15>
10、在组里新建一个图层,填充任意一种颜色作为参考,效果如下图。文字初步的立体效果出来了。

<图16>
11、在组里新建一个图层,现在开始渲染立体面的各个面的质感。用套索工具勾出下图所示的选区,选择渐变工具,颜色设置如图18,拉出土19所示的线性渐变。
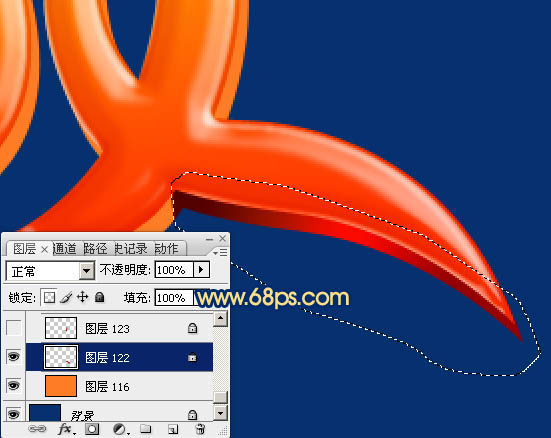
<图17>

<图18>

<图19>
12、新建一个图层,同上的方法再制作一个面,渐变色相同,如下图。

<图20>

<图21>
13、新建图层,同上的方法制作其他的面,过程如图22 - 28。没有简便方法,得逐个渲染。

<图22>

<图23>

<图24>

<图25>

<图26>

<图27>

<图28>
14、在图层的最上面创建亮度/对比度调整图层,适当增加对比度,参数及效果如下图。

<图29>

<图30>
再调整一下细节,完成最终效果。


1、首先我们把整体拆分为马头及文字,如下图。马头部分的教程请点这里查看。

<图1>

<图2>
2、保存下图所示的图片素材,新建一个1024 * 700像素的文件,背景填充黑色。打开保存的素材(PNG透明格式),用鼠标拖到新建的文件里面。

<图3>
3、把拖进来的文字解锁,是的移动位置,与马头拼接好。然后锁定图层像素区域,如下图。

<图4>
4、选择渐变工具,颜色设置如图5,在属性栏选择径向渐变,然后由下至上拉出土6所示的渐变色。

<图5>

<图6>
5、双击图层面板文字缩略图后的蓝色区域调出图层样式,设置斜面与浮雕及等高线,参数设置如图7,8,效果如图9。

<图7>

<图8>

<图9>
6、按Ctrl + J 把文字图层复制一层,如下图。

<图10>
7、双击文字副本后面的蓝色区域调出图层样式,修改一下斜面和浮雕及等高线的数值,如图11,12。确定好把图层填充改为:0%,不透明度改为:70%,效果如图13。

<图11>

<图12>

<图13>
8、安装Ctrl键点击图层面板文字缩略图载入文字选区,选择矩形选框工具,把选区往右下方移动移动距离,如下图。

<图14>
9、在背景图层上面新建一个组,给组添加图层蒙版,如下图。

<图15>
10、在组里新建一个图层,填充任意一种颜色作为参考,效果如下图。文字初步的立体效果出来了。

<图16>
11、在组里新建一个图层,现在开始渲染立体面的各个面的质感。用套索工具勾出下图所示的选区,选择渐变工具,颜色设置如图18,拉出土19所示的线性渐变。

<图17>

<图18>

<图19>
12、新建一个图层,同上的方法再制作一个面,渐变色相同,如下图。

<图20>

<图21>
13、新建图层,同上的方法制作其他的面,过程如图22 - 28。没有简便方法,得逐个渲染。

<图22>

<图23>

<图24>

<图25>

<图26>

<图27>

<图28>
14、在图层的最上面创建亮度/对比度调整图层,适当增加对比度,参数及效果如下图。

<图29>

<图30>
再调整一下细节,完成最终效果。

标签:
2014,马,生肖,立体字
蝙蝠岛资源网 Design By www.hbtsch.com
广告合作:本站广告合作请联系QQ:858582 申请时备注:广告合作(否则不回)
免责声明:本站文章均来自网站采集或用户投稿,网站不提供任何软件下载或自行开发的软件! 如有用户或公司发现本站内容信息存在侵权行为,请邮件告知! 858582#qq.com
免责声明:本站文章均来自网站采集或用户投稿,网站不提供任何软件下载或自行开发的软件! 如有用户或公司发现本站内容信息存在侵权行为,请邮件告知! 858582#qq.com
蝙蝠岛资源网 Design By www.hbtsch.com
暂无Photoshop打造出创意的2014马年生肖立体字的评论...
稳了!魔兽国服回归的3条重磅消息!官宣时间再确认!
昨天有一位朋友在大神群里分享,自己亚服账号被封号之后居然弹出了国服的封号信息对话框。
这里面让他访问的是一个国服的战网网址,com.cn和后面的zh都非常明白地表明这就是国服战网。
而他在复制这个网址并且进行登录之后,确实是网易的网址,也就是我们熟悉的停服之后国服发布的暴雪游戏产品运营到期开放退款的说明。这是一件比较奇怪的事情,因为以前都没有出现这样的情况,现在突然提示跳转到国服战网的网址,是不是说明了简体中文客户端已经开始进行更新了呢?
更新日志
2026年01月27日
2026年01月27日
- 小骆驼-《草原狼2(蓝光CD)》[原抓WAV+CUE]
- 群星《欢迎来到我身边 电影原声专辑》[320K/MP3][105.02MB]
- 群星《欢迎来到我身边 电影原声专辑》[FLAC/分轨][480.9MB]
- 雷婷《梦里蓝天HQⅡ》 2023头版限量编号低速原抓[WAV+CUE][463M]
- 群星《2024好听新歌42》AI调整音效【WAV分轨】
- 王思雨-《思念陪着鸿雁飞》WAV
- 王思雨《喜马拉雅HQ》头版限量编号[WAV+CUE]
- 李健《无时无刻》[WAV+CUE][590M]
- 陈奕迅《酝酿》[WAV分轨][502M]
- 卓依婷《化蝶》2CD[WAV+CUE][1.1G]
- 群星《吉他王(黑胶CD)》[WAV+CUE]
- 齐秦《穿乐(穿越)》[WAV+CUE]
- 发烧珍品《数位CD音响测试-动向效果(九)》【WAV+CUE】
- 邝美云《邝美云精装歌集》[DSF][1.6G]
- 吕方《爱一回伤一回》[WAV+CUE][454M]
