蝙蝠岛资源网 Design By www.hbtsch.com
素材图片主色比较暗,不过天空部分泛白,色彩过渡不是很好;处理的时候,先给天空换上霞光素材,然后在天空与地面衔接区域渲染一些暖色高光即可。
原图

最终效果

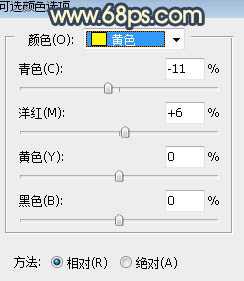
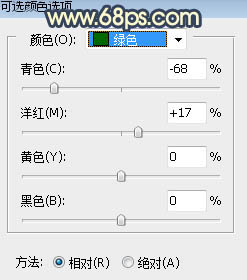
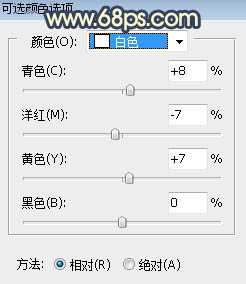
1、打开原图素材大图,创建可选颜色调整图层,对黄、绿、白进行调整,参数设置如图1 - 3,效果如图4。这一步给图片增加橙黄色,高光区域增加淡绿色。
<图1>
<图2>
<图3>

<图4>
2、按Ctrl + J 把当前可选颜色调整图层复制一层,效果如下图。

<图5>
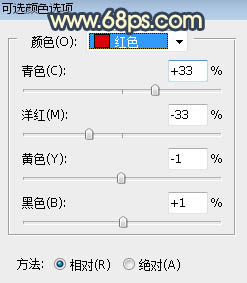
3、创建可选颜色调整图层,对红色,黄色进行调整,参数及效果如下图。这一步把人物背后墙的颜色转为橙黄色。
<图6>
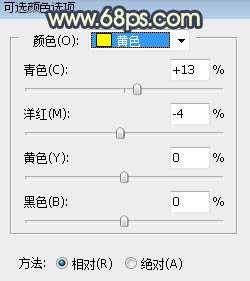
<图7>

<图8>
4、按Ctrl + Alt + 2 调出高光选区,按Ctrl + Shift + I 反选得到暗部选区,然后创建曲线调整图层,对RGB、红、蓝通道进行调整,参数及效果如下图。这一步把图片暗部压暗一点,并增加蓝红色。
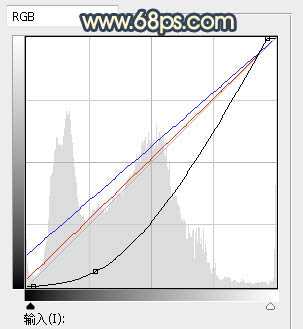
<图9>

<图10>
5、创建色彩平衡调整图层,对阴影,高光进行调整,参数设置如图11,12,确定后按Ctrl + Alt + G 创建剪切蒙版,效果如图13。这一步给图片暗部增加蓝色和淡青色。
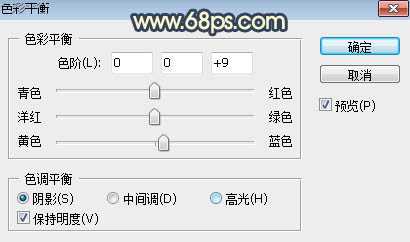
<图11>
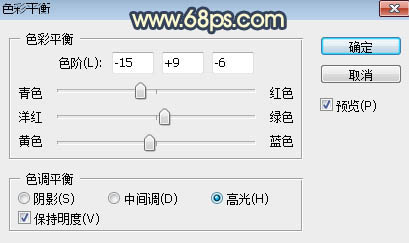
<图12>

<图13>
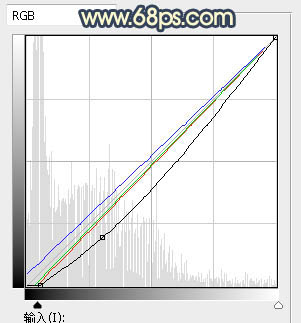
6、创建曲线调整图层,对RGB、红、绿、蓝通道进行调整,参数设置如图14,确定后创建剪切蒙版,效果如图15。这一步把图片暗部再压暗一点,并增加蓝紫色。
<图14>

<图15>
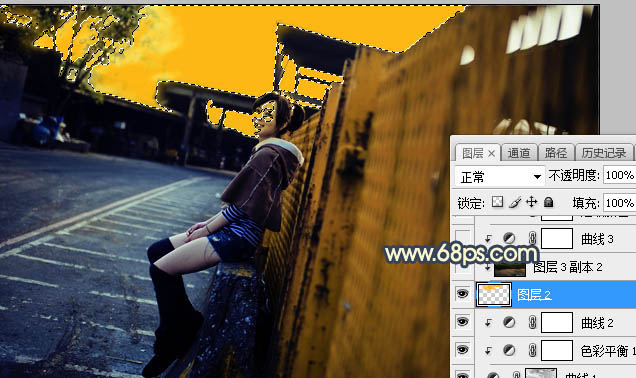
7、把背景图层复制一层,按Ctrl + Shift + ] 置顶,用通道把天空部分抠出来,转为选区后新建一个图层填充橙黄色,再把背景副本图层隐藏,效果如下图。
<图16>
8、打开天空素材大图,用移动工具拖进来,创建剪切蒙版后调整好位置,效果如图17。


<图17>
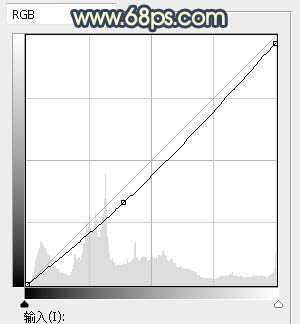
9、创建曲线调整图层,把RGB通道压暗一点,参数设置如图18,确定后创建剪切蒙版,效果如图19。这一步把天空部分调暗一点。
<图18>

<图19>
上一页12 下一页 阅读全文
原图

最终效果

1、打开原图素材大图,创建可选颜色调整图层,对黄、绿、白进行调整,参数设置如图1 - 3,效果如图4。这一步给图片增加橙黄色,高光区域增加淡绿色。

<图1>

<图2>

<图3>

<图4>
2、按Ctrl + J 把当前可选颜色调整图层复制一层,效果如下图。

<图5>
3、创建可选颜色调整图层,对红色,黄色进行调整,参数及效果如下图。这一步把人物背后墙的颜色转为橙黄色。

<图6>

<图7>

<图8>
4、按Ctrl + Alt + 2 调出高光选区,按Ctrl + Shift + I 反选得到暗部选区,然后创建曲线调整图层,对RGB、红、蓝通道进行调整,参数及效果如下图。这一步把图片暗部压暗一点,并增加蓝红色。

<图9>

<图10>
5、创建色彩平衡调整图层,对阴影,高光进行调整,参数设置如图11,12,确定后按Ctrl + Alt + G 创建剪切蒙版,效果如图13。这一步给图片暗部增加蓝色和淡青色。

<图11>

<图12>

<图13>
6、创建曲线调整图层,对RGB、红、绿、蓝通道进行调整,参数设置如图14,确定后创建剪切蒙版,效果如图15。这一步把图片暗部再压暗一点,并增加蓝紫色。

<图14>

<图15>
7、把背景图层复制一层,按Ctrl + Shift + ] 置顶,用通道把天空部分抠出来,转为选区后新建一个图层填充橙黄色,再把背景副本图层隐藏,效果如下图。

<图16>
8、打开天空素材大图,用移动工具拖进来,创建剪切蒙版后调整好位置,效果如图17。


<图17>
9、创建曲线调整图层,把RGB通道压暗一点,参数设置如图18,确定后创建剪切蒙版,效果如图19。这一步把天空部分调暗一点。

<图18>

<图19>
上一页12 下一页 阅读全文
标签:
人物,霞光
蝙蝠岛资源网 Design By www.hbtsch.com
广告合作:本站广告合作请联系QQ:858582 申请时备注:广告合作(否则不回)
免责声明:本站文章均来自网站采集或用户投稿,网站不提供任何软件下载或自行开发的软件! 如有用户或公司发现本站内容信息存在侵权行为,请邮件告知! 858582#qq.com
免责声明:本站文章均来自网站采集或用户投稿,网站不提供任何软件下载或自行开发的软件! 如有用户或公司发现本站内容信息存在侵权行为,请邮件告知! 858582#qq.com
蝙蝠岛资源网 Design By www.hbtsch.com
暂无Photoshop调制出漂亮的霞光色厂区人物图片的评论...
更新日志
2026年01月30日
2026年01月30日
- 小骆驼-《草原狼2(蓝光CD)》[原抓WAV+CUE]
- 群星《欢迎来到我身边 电影原声专辑》[320K/MP3][105.02MB]
- 群星《欢迎来到我身边 电影原声专辑》[FLAC/分轨][480.9MB]
- 雷婷《梦里蓝天HQⅡ》 2023头版限量编号低速原抓[WAV+CUE][463M]
- 群星《2024好听新歌42》AI调整音效【WAV分轨】
- 王思雨-《思念陪着鸿雁飞》WAV
- 王思雨《喜马拉雅HQ》头版限量编号[WAV+CUE]
- 李健《无时无刻》[WAV+CUE][590M]
- 陈奕迅《酝酿》[WAV分轨][502M]
- 卓依婷《化蝶》2CD[WAV+CUE][1.1G]
- 群星《吉他王(黑胶CD)》[WAV+CUE]
- 齐秦《穿乐(穿越)》[WAV+CUE]
- 发烧珍品《数位CD音响测试-动向效果(九)》【WAV+CUE】
- 邝美云《邝美云精装歌集》[DSF][1.6G]
- 吕方《爱一回伤一回》[WAV+CUE][454M]
