看起来很复杂的样子,其实方法会了也简单,没有什么难事的
最终效果:

教程分3部分,背景;图形;文字。好了,此教程由软件自学网首发,开始吧!
1、新建矩形框,去掉填充、描边。

然后新建填充,填充渐变。

然后再在上层新建填充,填充亮一点的灰色,对灰色应用效果-艺术效果-胶片颗粒。然后把混合模式改为正片叠底

再在最上层新建填充,填充径向渐变(白色-灰色),在透明度面板把混合模式改为正片叠底。

2、下面我们来制作图形。其实图形也是由许多外观面板里的填充和描边组成。首先新建圆形,去掉填充和描边。

新建0.75pt的高光描边,填充亮红色,对描边应用效果-扭曲和变形-波纹效果。

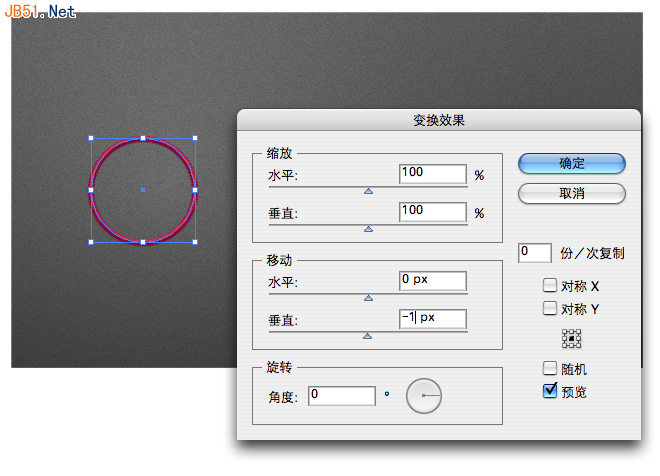
同样方法新建0.75pt中间色和2pt暗部描边,同样应用波纹效果。然后对高光描边应用效果-扭曲和变形-变换效果

同样对暗部描边应用应用效果-扭曲和变形-变换效果。

放大效果。

这时在图层样式面板中,把这个效果新建为图层样式以备后面使用。


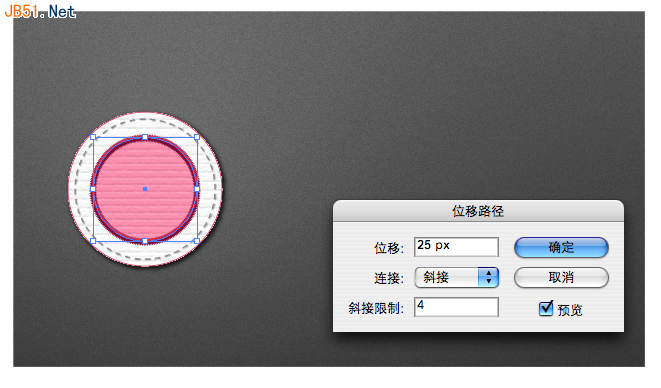
然后再新建亮灰色填充,应用效果-路径-位移路径。再应用效果-纹理化-纹理化效果。
然后应用-效果-风格化-投影。


在亮灰色层上层新建1pt灰色虚线描边,此教程由软件自学网首发,对描边应用效果-风格化-投影。

然后我们做最外圈的针线边,这个原理和上面做内圈一样,不同的是要对每个描边应用效果-路径-位移路径。


图形完成。

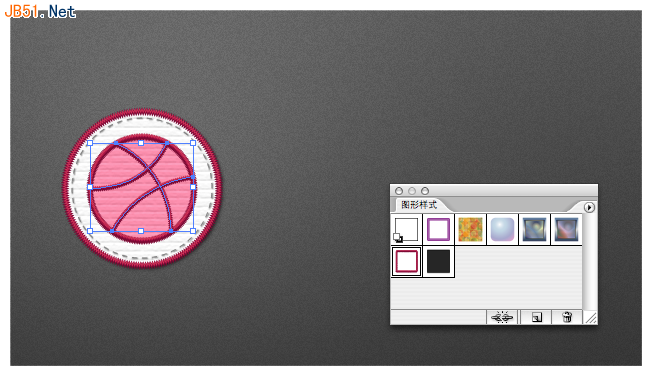
钢笔工具画曲线,然后应用我们之前新建的图层样式。


现在可能有点乱,但是你可以看下面这个圆形的外观面板,此教程由软件自学网首发,我们一共有这么多填充和描边层,以及每一个层的位置和应用的效果,可以自己想一想,基本就OK了。


文字,输入文字,去掉填充和描边。

新建中间调填充,填充渐变,上暗下稍亮。

新建高光填充,此教程由软件自学网首发,填充亮灰色,应用变换效果。

新建暗部,填充黑色,应用变换。


把文字效果新建为图层样式。

输入其他文字,对文字应用刚新建的图层样式。


大功告成。看似复杂,把原理掌握了,就很简单了。希望你学会了,哈哈!!!!

免责声明:本站文章均来自网站采集或用户投稿,网站不提供任何软件下载或自行开发的软件! 如有用户或公司发现本站内容信息存在侵权行为,请邮件告知! 858582#qq.com
更新日志
- 小骆驼-《草原狼2(蓝光CD)》[原抓WAV+CUE]
- 群星《欢迎来到我身边 电影原声专辑》[320K/MP3][105.02MB]
- 群星《欢迎来到我身边 电影原声专辑》[FLAC/分轨][480.9MB]
- 雷婷《梦里蓝天HQⅡ》 2023头版限量编号低速原抓[WAV+CUE][463M]
- 群星《2024好听新歌42》AI调整音效【WAV分轨】
- 王思雨-《思念陪着鸿雁飞》WAV
- 王思雨《喜马拉雅HQ》头版限量编号[WAV+CUE]
- 李健《无时无刻》[WAV+CUE][590M]
- 陈奕迅《酝酿》[WAV分轨][502M]
- 卓依婷《化蝶》2CD[WAV+CUE][1.1G]
- 群星《吉他王(黑胶CD)》[WAV+CUE]
- 齐秦《穿乐(穿越)》[WAV+CUE]
- 发烧珍品《数位CD音响测试-动向效果(九)》【WAV+CUE】
- 邝美云《邝美云精装歌集》[DSF][1.6G]
- 吕方《爱一回伤一回》[WAV+CUE][454M]
